More Progress

Progress is ramping up with the new wiring loom being fitted now. In conjunction with this the newly reconditioned gauges are being prepared for fitting. This should resolve the shorted out fuel gauge and indicator repeater on the dashboard.

The front apron has also been fitted now so all of the panels with the exception of the bonnet have now been refitted.

An electric windscreen washer system is being fitted although this may be changed next year for a reproduction Lucas washer system with a glass bottle.

More Details

I’m keen for JSK to remain as original as possible. One of the items that seemed to have been swapped out during a previous owners time is the fuel cap. It looks like the TR3 one has been swapped out for a TR250/TR5 cap at some point.

The manifold in my car, while sound wasn’t looking up to much. Although not an original finish, blasting and stripping the exhaust manifold and painting with high temperature paint is very common.

Dashboard

As part of the restoration of the car I decided to convert JSK to right hand drive. There’s an argument about originality and ease of resale (more potential buyers in Europe) but to be honest, I’m not looking to sell the car any time soon and I would prefer the wheel to be on the “correct” side for the UK. One of the biggest issues for a RHD conversion is finding a decent metal dashboard. After all, it was just over 10% of cars that were RHD and most of them have now been scrapped. So finding a RHD original dash in good condition is something of a rarity. Fortunately, a kindly TR Register member took pity on me an supplied all of the parts needed to convert JSK to RHD for a mere £250. All the parts were in remarkably good condition so for the dashboard it was a simple matter of sanding, priming and painting to protect it from rust, prior to wrapping in vinyl.

Engine & Gearbox Fitment

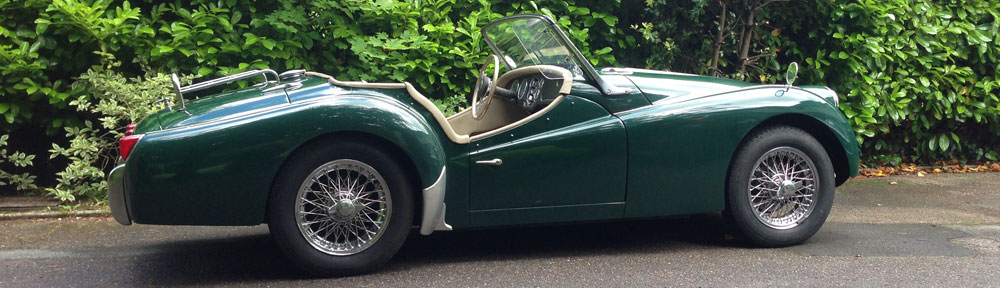
The time to fit the engine and gearbox has finally arrived. The gearbox has been fully reconditioned but came with an early TR2 overdrive cover which means overdrive would only work in 4th gear (rather than 2/3/4th as a TR3 should). This cover has now been changed for the correct type and wired in so o/d works in all the right gears. The gearbox is the correct 3 synchro type for the TR3 rather than a four synchro model for a TR4. It’s a common upgrade to change to the four synchro gearbox but I would to keep the car as original as possible. And after all, it’s not difficult to wait to fully stop before engaging first gear. The gearbox is also fitted with the correct short throw gear lever rather than the long one fitted to a TR4. This is important so that your hand doesn’t foul on the bottom of the dashboard when changing gear.

It’s a small detail, but you can see in the first image that the correct lock nut has been fitted to the gear lever. I’ve failed to find the correct threaded nut from either Moss or Rimmer and this should mean the gear knob now fits correctly.

All of the perished/missing blanking grommets have been replaced with new. The heater tap under the bonnet, which looked like it came from someones central heating, has been replaced with the correct brass type, and the reconditioned wiper motor has been fitted.

All of the copper brake and clutch lines are being replaced with new. The previous pipes had been sprayed green when the car was painted last time.

Most importantly you can see the steering column has been fitted now so at last, the steering wheel will be on the “right” side.

Massive Progress Made

I emailed Watermill today for an update after watching the Timeshift program on BBC over the weekend reminded me I still owned a classic British car!

A whole raft of images followed with a description of the work so far. And boy, has progress been swift over the last couple of weeks. All the metalwork has now been finished and the engine bay has been painted. Now the real assembly work can start in earnest.

The steering components have now been fitted and the car is half way to being right hand drive at last.

Engine and gearbox will be fitted this week along with new brake lines in the engine bay (replacing the badly sprayed over ones originally fitted). The dashboard and door cappings (which were missing completely when I bought the car) are in pretty bad shape and will be worked on and covered next week.

Progress on Inner Sills and WIngs

Some more images of the work to the inner wings and sills have come through. The bulkhead repair panel is in, as is the new battery box. The left hand inner wing had to be removed as it had a large hole in the rear where it meets the bulkhead. Unfortunately, the inner sill had also rotted away (see previous posts) but all of this has now been repaired.

All of this is being prepared for paint this week now so things are starting to all go back together. All in all, there has been a huge amount of work completed that hadn’t been factored in at the beginning of the work. If you had suggested that the body would have to be lifted from the chassis and the inner wings removed for such repairs I might not have gone on with the project. However, all the accident damage previously has been repaired properly now and the body will sit straight with all mounts intact (rather than the bodge-it-and-leggit work done previously where one mount was cut and the body jacked up with spacers on the other side). Ultimately, the car has been apart now to its component parts so hopefully there shouldn’t be any more surprises lurking and the car is 100% metal.

These are pictures of the left hand inner sill before and after repair.