Engine Bay Progress

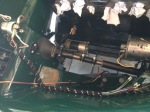
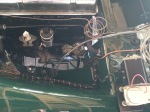
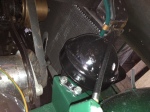
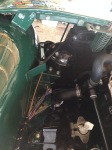
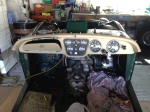
Some more pictures arrived today of the engine bay going back together. The new loom has all been connected up now. The ignition system has been refitted now as has the intake and exhaust manifolds and the carburettors.

There are quite a few little details that are going to annoy me with the engine bay but on the other hand they’ll make some nice winter projects for me to fettle with. For instance, the manifold nuts are ugly and need replacing. Which is also really annoying as I bought a set of these and lost them. I still want to replace the dampers in the SU’s with new brass ones.

The battery needs to go in my mind but a more period style one is £175 and until I get the car back and work out where I am with budget (or lack of it), this one will have to stay.

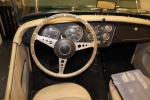
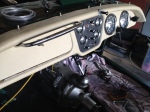
But most importantly, the car now has it’s identity back now the commission plates have been replaced.

Job to do – a quick catchup

Progress on the car has been coming on nicely so far so I thought I’d pop down a list of jobs to finish as far as I can tell.

  • Fit exhaust manifold and new stainless steel exhaust
  • Fit inlet manifold and carburetors
    • Replace dampers for new brass
    • Check carbs and rebuild if necessary
  • Fit distributor (check/rebuild) and ignition system
  • Complete wiring
  • Recondition prop shaft UJ’s
  • Recondition differential
  • Refit interior mirror and windscreen
  • Refit bonnet, front bumper and new number plates
  • Paint front wing under wing mirror
  • Replace interior seats and panels
  • Fit adjustable steering wheel and control head
  • Replace doors and align
  • Remove fuel tank, weld boot floor. Replace fuel tank
  • Fit weather equipment (sidescreens, hood, tonneau, hood cover)
  • New spare wheel and leather strap
  • New MOT

Things I would like to replace depending on budget

  • Replace wire wheels and spinners
  • Replace headlamps with Lucas PL700 Tripod
  • Replace rear overriders
  • Replace rocker cover or rechrome
  • Replace washer bottle with Lucas glass bottle
  • Paint dynamo black rather than chrome
  • Fit starting handle guides
  • Replace handles and hinges
  • Odometer reset handle on speedo

Under Bonnet Details

I’ve had some more images through which show some interesting under bonnet progress and details

Picture 1 shows the steering column has been installed now and all the sleeves have been painted and reconditioned. You can also see the new gaiter for the steering column – the previous one had been repaired several times with mastic. The new woven fabric wiring loom is in place now and a new brass drain tap has been fitted to the engine.

In picture 2, you can see the new capillary tube for the reconditioned temperature gauge that has now been fitted. The old one was frozen in the thermostat housing. The bracket for the new washer bottle has been fitted and the correct new Lucas ignition coil that I purchased at Beaulieu last year has also been refitted. The engine still retains the original paper type oil filter rather than a screw on conversion. The fuel pump has been retained as this was fitted by the previous owner relatively recently.

Picture 3 shows one of the original high/low horns that has been repainted. The reconditioned radiator has been refitted and the overflow tube routed correctly. The dynamo has been retained (it was reconditioned recently) along with the original wide belt.

In picture 4 you can see the stay rods for the radiator have been painted and refitted. The radiator was recored recently (with the original hole for the starter handle).

Interior Progress

Some more progress has been made on the dashboard which has now been fitted to the car. The right hand drive conversion has now been finished and the dashboard now has the correct chrome grab handle fitted at last. Note also, that the overdrive switch has been fitted.

The new dash panel has been fitted with all new gauges. The console has been restored with the correct crackle black finish. The new choke cable has yet to be fitted (although the “old” choke cable was also new – I’ll keep this for a spare). I know I’ve mentioned it in a previous post, but Frank in the US who reconditioned the panel and gauges is a genius and this really is a work of art.

The old Mota Lita steering wheel is being replaced for the correct original adjustable type steering wheel which is similar in style to that fitted to Austin Healey’s and Series 1 Land Rovers. However, the TR3 one has a unique fitting and is very rare. A new control head will also be fitted as the self cancelling mechanism on the old one was not working correctly.